In this tutorial, we are going to create a textured tag that you can use in your website designs. Adding textured elements to modern web designs is a current trend. Learn how to create your own texture and then apply it to your design element.<
In this tutorial, we are going to create a textured tag that you can use in your website designs. Adding textured elements to modern Web designs is a current trend. Learn how to create your own texture and then apply it to your design element.
Step 1
Create a new document 500px wide by 200px height. Then set up our main background colors. Make the backgrounds we will create stretch the full document width. Create a new layer and give the top 10px a dark brown color. Also create a lighter brown 1px highlight below that. Then create a new layer from there down to the 75px mark. Make that a mid-range brown. Then create another new layer and make a light gray to a lighter gray linear gradient from there down to the 110px mark. Place a 1px white highlight below the 75px mark and a darker gray 1px highlight just below the 110px mark. Make the rest of the document background at the bottom white. This gives us a Web-style layout with a color range similar to PSDTUTS.

Step 2
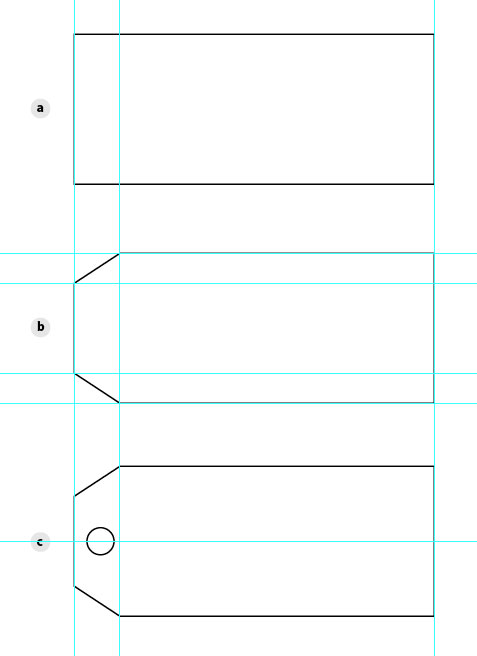
Open up Illustrator. Create a new document. In step 2a make a rectangle that is 240px wide by 100px height. In step 2b use the Add Anchor Point Tool and add a couple anchor points where you want to make the shape of your tag. Use a guide to keep things lined up. Then pull your corners in 20px on the top left and bottom left corners. In step 2c draw what will become our cut-out hole in our tag. Again use guides so it is centered.
Step 3
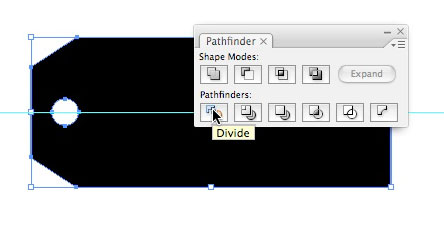
Then use the Divide tool in the Pathfinder Palette to cut out the hole in the tag.
Step 4
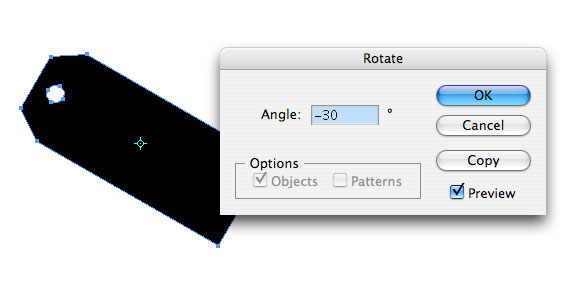
Next use the Rotate tool (R) and rotate the tag -30 degrees.
Step 5
Copy our tag and paste it into Photoshop. Choose Paste as Path.
Step 6
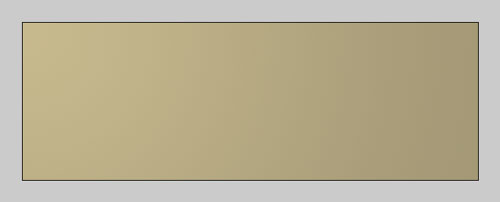
Create a new Photoshop document that is a double the size of our tag at 580px wide by 200px height. We'll use this to make our background texture. Give it a Linear Gradient from from a mid range tan to a slightly darker tan. Draw the gradient line from the top left-hand corner down to the bottom right-hand corner.
Step 7
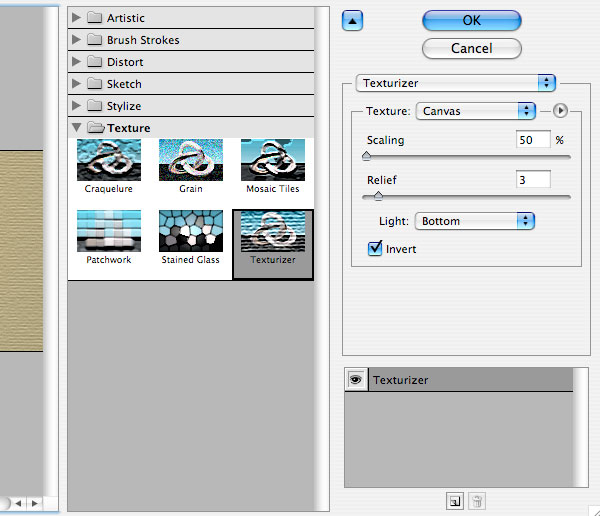
Turn that gradient into some texture using the settings below.
Step 8
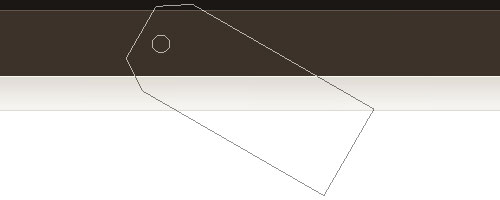
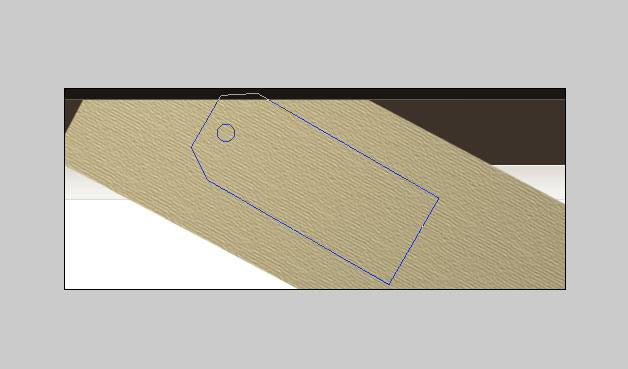
Copy our texture into our main document and rotate it so that it is set at the same angle as our tag.
Step 9
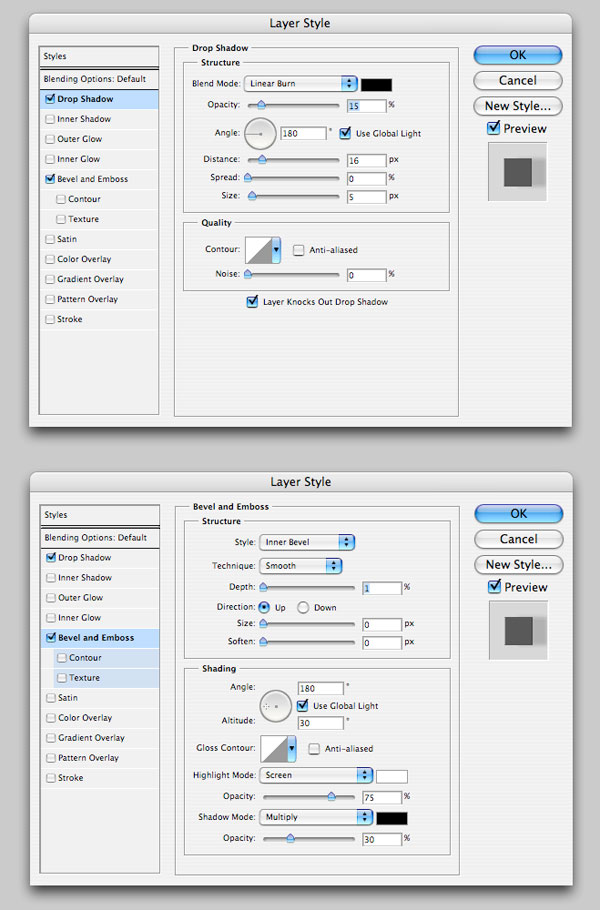
Then go to the Paths palette and make a selection of that path. Copy the selction. Delete the layer. Then paste our tag in place. Give our tag the layer styles below to give it some depth.
Step 10
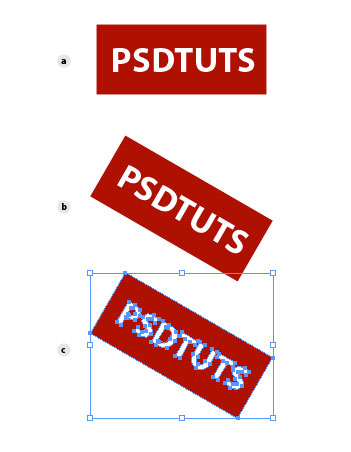
Back in Illustrator, for part 10a create a red box 170px wide by 70px height. Put the text PSDTUTS inside. Then with the text selected, go to Type > Create Outlines. Then rotate the red box with the text selected -30 degrees, see 10b below. Now we select the text and the box, and in the Pathfinder palette choose Divide. Then select each letter and delete it. So we have a red box with the letters cut out of it, see 10c below. Copy that box and head back over to our Photoshop document.
Step 11
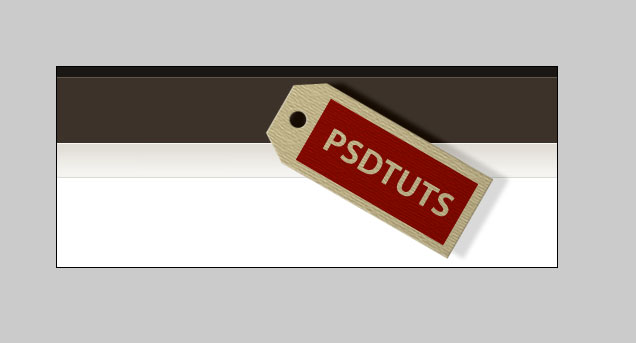
Paste the copied text and set the layer style to Multiply.
Step 12
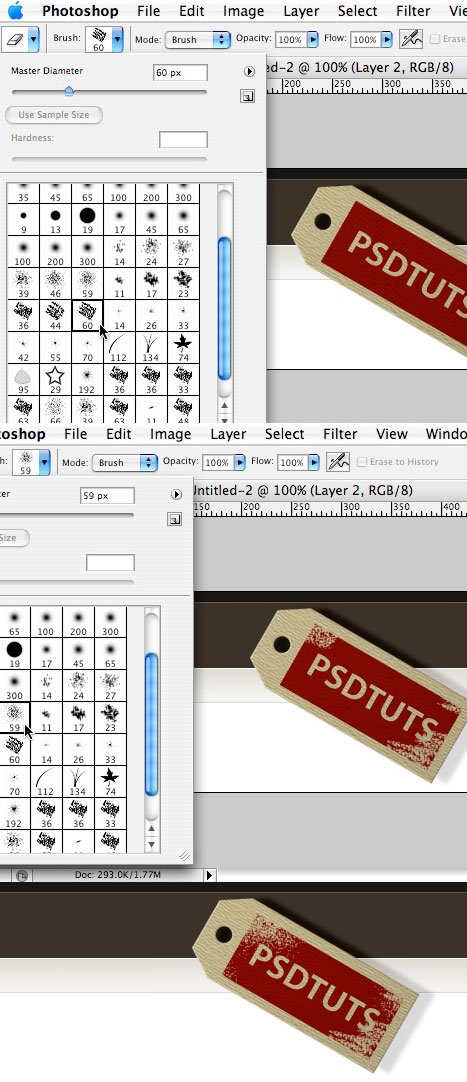
Grab the eraser tool and add some texture by erasing some of our red text box. You can see the erasers I used below as well as the effect on the tag.
Step 13
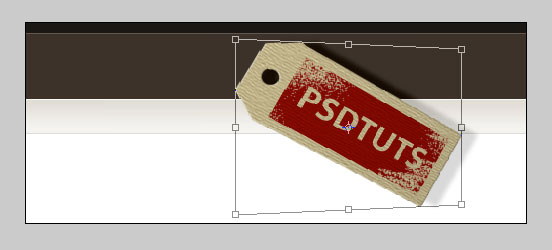
You may be happy with the results we have so far and want to stop apply effects to the tag. That would be fine. I'm going to go ahead and add some additional depth though. Go to Edit > Transform > Perspective and drag the left bottom handle up a little bit.
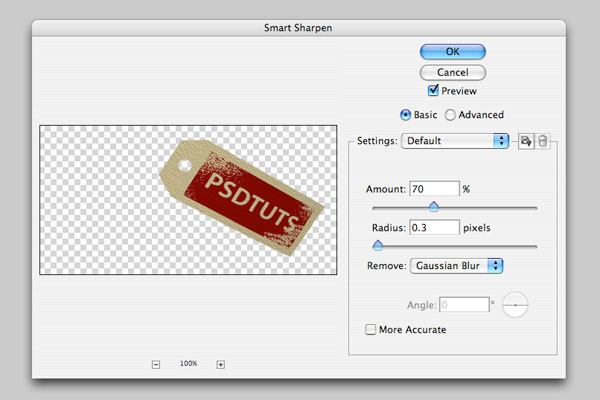
Step 14
The transform pixelated our tag a little so to clean that up, go to Filter > Sharpen > Smart Sharpen. Use the settings below.
Step 15
To match the angle of our transform and to add a little bit more depth, grab the Blur Tool and apply it to the bottom right-hand corner of the tag.

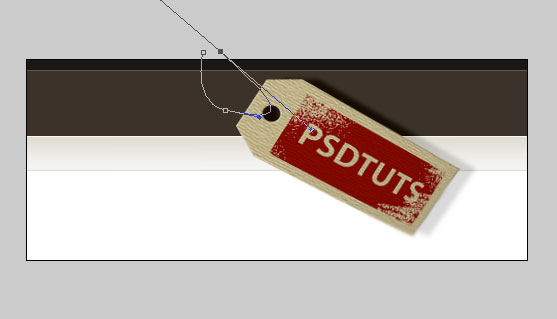
Step 16
Grab the Pen Tool and draw a line that will form our cord to hold our tag in place.
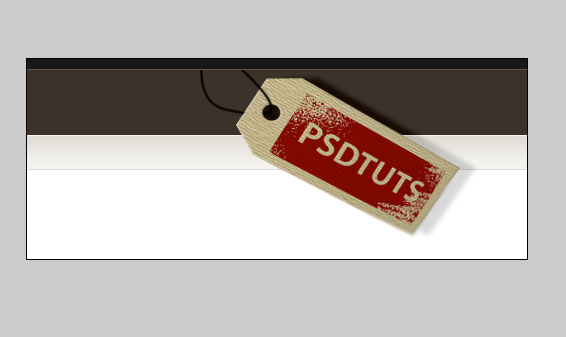
Step 17
Flip over to the Brush Tool and set the brush at 3px with a Hardness of 100 percent. Make sure we have our Foreground color set to black. Switch back to the Pen Tool and either right-click or Ctrl-click and then select Stroke Path. Then get in there with a small Eraser and carefully remove the lower left part of the cord that overlaps the tag. This will make it look like the cord goes through the hole in the tag.
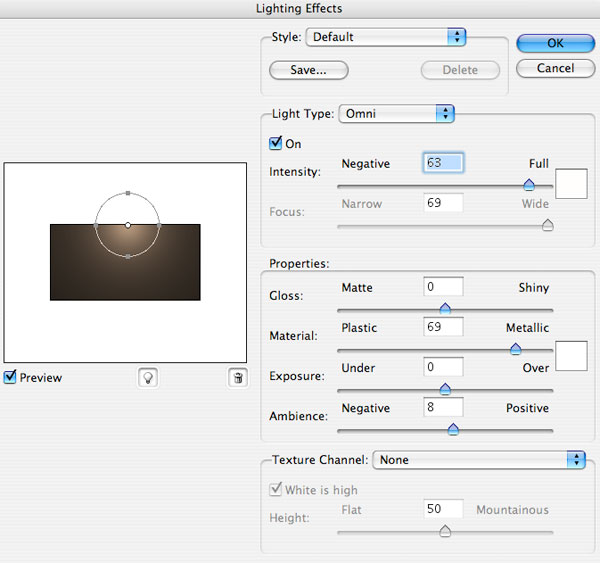
Step 18
Right now, the background behind the cord going through the hole is really dark. We want to be able to see that. So lets add some lighting. Copy our mid-range brown background. Go to Filter > Render > Lighting Effects and use the settings below.
Step 19
I set this copy of the background to Lighten and then moved it with the tag into the center of our document. Our final tag is shown below.

Conclusion
Creating texture is a lot of fun. It makes design elements that you create unique. Let me know if you find a cool use for your own tag design.
/p>Step 1
Create a new document 500px wide by 200px height. Then set up our main background colors. Have these backgrounds we are about to create stretch the full document width. Create a new layer and give the top 10px a dark brown color. Also create a lighter brown 1px highlight below that. Then create a new layer from there down to the 75px mark. Make that a mid range brown. Then create another new layer and make a light gray to a lighter gray linear gradient from their down to the 110px mark. Place a 1px white highlight below the 75px mark and a darker gray 1px highlight just below the 110px mark. Make the rest of the document background at the bottom white. This gives us a web style layout with a color range similar to PSDTUTS.
Step 2
Open up Illustrator. Create a new document. In step 2a make a rectangle that is 240px wide by 100px height. In step 2b use the Add Anchor Point Tool and add a couple anchor points where you want to make the shape of your tag. Use a guide to keep things lined up. Then pull your corners in 20px on the top left and bottom left corners. In step 2c draw what will become our cut out hole in our tag. Again use guides so its centered.
Step 3
Then use the Divide tool in the Pathfinder Palette to cut out the hole in the tag.
Step 4
Next use the Rotate tool (R) and rotate the tag a negative 30 degrees.
Step 5
Copy our tag and paste it into Photoshop. Choose Paste as: Path.
Step 6
Create a new Photoshop document that is a double the size of our tag at 580px wide by 200px height. We'll use this to make our background texture. Give it a Linear Gradient from from a mid range tan to a slightly darker tan. Draw the gradient line from the top left hand corner down to the bottom right hand corner.
Step 7
Turn that gradient into some texture using the settings below.
Step 8
Copy our texture into our main document and rotate it so that it is set at the same angle as our tag.
Step 9
Then go to the Paths palette and make a selection of that path. Copy the selction. Delte the layer. Then paste our tag in place. Give our tag the layer styles below to give it some depth.
Step 10
Back in Illustrator for part 10a create a red Box 170px wide by 70px height. Put the text PSDTUTS inside. Then with the text selected go to Type > Create Outlines. Then rotate the red box with the text selected a negative 30 degrees, see 10b below. Now we select the text and the box and in the Pathfinder palette choose Divide. Then select each letter and delete it. So we have a red box with the letters cut out of it, see 10c below. Copy that box and head back over to our Photoshop Document.
Step 11
Paste the copied text and set the layer style to Multiply.
Step 12
Grab the eraser tool and add some texture by erasing some of our red text box. You can see the erasers I used below as well as the effect on the tag.
Step 13
You may be happy with the results we have so far and want to stop apply effects to the tag. That would be fine. I'm going to go ahead and add some additional depth though. Go to Edit > Transform > Perspective and drag the left bottom handle up a little bit.
Step 14
The transform pixelated our tag a little so to clean that up go to Filter > Sharpen > Smart Sharpen. Use the settings below.
Step 15
To match the angle of our transform and to add a little bit more depth grab the Blur Tool and apply it to the bottom right hand corner of the tag.
Step 16
Grab the Pen tool and draw a line that will form our cord to hold our tag in place.
Step 17
Flip over to the Brush tool and set the brush at 3px with a Hardness of 100 percent. Make sure we have our Foreground color set to black. Switch back to the Pen tool and either right click or control click and then select Stroke Path. Then get in there with a small Eraser and carefully remove the lower left part of the cord that overlaps the tag. This will make it look like the cord goes through the hole in the tag.
Step 18
Right now the background behind the cord going through the hole is really dark. We want to be able to see that. So lets add some lighting. Copy our mid range brown background. Go to Filter > Render > Lighting Effects and use the settings below.
Step 19
I set this copy of the background to Lighten and then moved it with the tag into the center of our document. Our final tag is shown below.
Conclusion
Creating texture is a lot of fun. It makes design elements that you create unique. Let me know if you find a cool use for your own tag design.
0 comments:
Post a Comment